 If you wanted to build your own Android app to connect to a Python service, over Bluetooth, to control a Raspberry Pi, you just found the resources to do so. I know there are plenty of apps that control a Raspberry Pi. Most of them connect over SSH and some of them using Bluetooth. However, finding a tutorial that teaches you how to build your own is harder. You can probably do some research like I did and write an app but I haven’t managed to get the whole information in the same place.
Motivation
My aim is to share the knowledge I gathered and give you some basic source code that puts you on the right track. I will teach you how to write an easy to extend Python service and an Android app to connect to it. All the communication will happen over Bluetooth therefore removing the need of having a WiFi connection.
Also this article is the perfect place to get into Python Bluetooth programming. Also, at the same time you can get a glimpse about developing apps in Xamarin because the Android app is written using this platform.
You can get the whole source code for this project from my GitHub repo
https://github.com/levifuksz/raspibt
What do you need
For both the Python service and the Android app some basic coding skill is needed. I tried to keep the code easy to follow and well documented but a bit of understanding always helps. For the Python service part you can use your favorite editor to write the code. However, for the Android app you will need a bit more than that.
First of all you need Visual Studio IDE. You can fetch the 2017 Community version for free from the Microsoft website. Here is the link to it :
https://www.visualstudio.com/
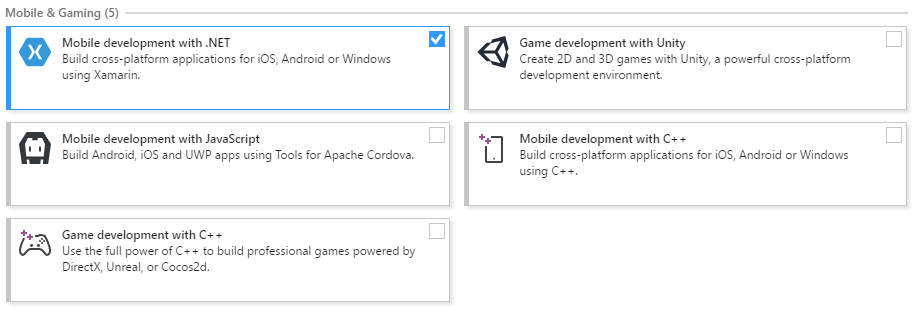
Make sure that when you are installing Visual Studio 2017 you also install the Xamarin Platform as shown in the image below.

The Xamarin Platform also comes as a separate installer. This is useful when you already have Visual Studio 2017 installed or you have an older version. Grab the setup from:
https://www.xamarin.com/platform
Setting up the Raspberry Pi
Fire up a terminal and start by updating and upgrading the packages on your Raspbian
sudo apt-get update && sudo apt-get upgrade
The Python service uses the Pybluez extension and you can check it at.
https://karulis.github.io/pybluez/
Furthermore, Pybluez requires two additional software packages. These are the Python Development Library and the Bluetooth Development Library. You can get them both using:
sudo apt-get install python-dev libbluetooth-dev
You can install Pybluez using PIP, the Python package management system so just type:
sudo pip install pybluez
In addition, for the Python Bluetooth service to work, we will need to load the Serial Port Profile. This in turn requires the Bluetooth Daemon to run in compatibility mode. Start by editing the service startup parameters in its configuration file:
sudo nano /etc/systemd/system/dbus-org.bluez.service
Just add a -C after bluetoothd. The line should look like below:
ExecStart=/usr/lib/bluetooth/bluetoothd -C
Now reload the service configuration and restart the Bluetooth service with the following two commands
sudo systemctl daemon-reload
sudo systemctl restart dbus-org.bluez.service
Finally, you can now load the Serial Port profile by issuing:
sudo sdptool add SP
You should get a Serial Port service registered message as a result, telling you that the operation was successful.
The Python service explained
The service code in the raspibtsrv.py is pretty self explanatory.
Logging
The first few lines set up the logging for the script. Because our intention is to run this script as a service, all output needs to be written to files. The simplest way we can achieve this is by redirecting the Standard Output and Standard Error streams. The code from the setup_logging function starting on line 22 does exactly this. The logging was inspired by the article Stephen C. Phillips wrote at
Getting a Python script to run in the background (as a service) on boot
All output is saved to “/var/log/raspibtsrv.log” by default and can be changed with a script parameter. Log files are being rotated at midnight and only the last three log files are kept. The logger also appends the timestamp and the severity level for each message. Feel free to change this according to your needs.
Bluetooth setup
The “Control a Raspberry Pi” magic happens in the main function starting at line 70. The first few lines create a new Bluetooth socket using the RFCOM protocol and binds it to any available adapter and port.
# Create a new server socket using RFCOMM protocol
server_sock = BluetoothSocket(RFCOMM)
# Bind to any port
server_sock.bind(("", PORT_ANY))
# Start listening
server_sock.listen(1)
Because multiple Bluetooth “servers” may run on a single adapter there is a need to identify our service using something unique. This happens on lines 80 and 83. Here an UUID is advertised so any client knowing the UUID may connect. The same value for the service UUID is used in the Android app. Therefore, if you decide to change it please do it in both places.
# The service UUID to advertise
uuid = "7be1fcb3-5776-42fb-91fd-2ee7b5bbb86d"

# Start advertising the service
advertise_service(server_sock, "RaspiBtSrv",
				   service_id=uuid,
				   service_classes=[uuid, SERIAL_PORT_CLASS],
				   profiles=[SERIAL_PORT_PROFILE])
Receiving commands
The next step is to receive commands from the client. For each command do something specific and then respond to the client with a message. The list of the commands the script accepts is declared on line 90. There is also a special command, “getop”, that returns all supported commands to the client. Feel free to add more to suit your needs. Based on what the script receives on line 105 it acts starting from line 112. This is where you can add your own logic.
# Read the data sent by the client
data = client_sock.recv(1024)
if len(data) == 0:
	break

print "Received [%s]" % data

# Handle the request
if data == "getop":
	response = "op:%s" % ",".join(operations)
elif data == "ping":
	response = "msg:Pong"
elif data == "example":
	response = "msg:This is an example"
# Insert more here
else:
	response = "msg:Not supported"

client_sock.send(response)
print "Sent back [%s]" % response
Starting the Python service on boot
The next part of the tutorial assumes that the Python Bluetooth script is placed in a file named raspibtsrv.py at /home/pi/raspibtsrv/.
We want to control a Raspberry Pi over Bluetooth without any other interaction. Therefore our Python script containing the Bluetooth service needs to start on boot. The best way we can achieve this is by creating a systemd unit file that will execute our script.
Start by marking the Python script as executable
sudo chmod +x /home/pi/raspibtsrv/raspibtsrv.py
First of all, create the systemd unit file
sudo nano /etc/systemd/system/raspibtsrv.service
Paste in the following code (also changing paths if necessary)
[Unit]
Description=Raspberry PI Bluetooth Server
After=bluetooth.target

[Service]
Type=simple
User=root
Group=root
WorkingDirectory=/home/pi/raspibtsrv
ExecStart=/home/pi/raspibtsrv/raspibtsrv.py -l /home/pi/raspibtsrv/raspibtsrv.log

[Install]
WantedBy=multi-user.target
Now it is time to reload the systemd daemon configuration and enable the new service auto start.
sudo systemctl daemon-reload
sudo systemctl enable raspibtsrv.service
Finally, in order to check if everything is fine you need to reboot your Raspberry Pi.
sudo reboot
After the device has restarted check the status of the service using
sudo systemctl status raspibtsrv.service
Our service should be marked as active (running).
You can also check the log file to see if it got created. The log file should state that the Bluetooth service is listening.
cat /home/pi/raspibtsrv/raspibtsrv.log
The Android App
You can get the Android app that communicates with the Python service we just set up from
https://github.com/levifuksz/raspibt/tree/master/android-app
As I mentioned before, you need Visual Studio with Xamarin installed in order to compile the code. Just as the code in the Python service, the code from this app is also pretty well documented. Most of the things happen in two files: BtDiscovery.cs and BtClient.cs. Both are located under the Services folder in the RasPiBtControl.Android project.
The only thing you need to change is the Service UUID in Model\BtDeviceInfo.cs. This needs to match the UUID from the Pythons script. If you have not touched it then leave it unchanged here too.
The app only works if you have paired your phone with your Raspberry Pi, please do this first before using it.
Also, if you feel like extending the list of messages sent by the Python service that are supported by the app, update the LandingPageViewModel.cs file on line 168.
As a conclusion, there is no need for complicated solution to control a Raspberry Pi with your phone, all you need is a simple Python script and an even simpler app. Enjoy them both!
Further reading
To get a better hold on Python Bluetooth development take a look at this excellent tutorial written by Albert Huang from MIT:
An Introduction to Bluetooth Programming
Furthermore, read about unit files:
Understanding Systemd Units and Unit Files
Also, now that you can control a Raspberry Pi, turn it into a seedbox by following my other article
Turn your Raspberry Pi into a seedbox
T3ZlciBBbmQgT3V0IQ==

Be First to Comment