
If you are reading this tutorial over a wireless connection, or at least you have a wireless network in your house, take a breath and ask yourself, how safe do you feel? Did you use a strong password when you set up your wireless network? Does the password you use to connect to your WiFi contain your birthday, or your pet name by mistake? Do you feel it is strong enough? Are you alone in there? Or your neighbor is using the same connection to browse the internet without you knowing?
I hope that by reading this tutorial you will get an answer to those questions. You will see you how vulnerable a wireless network can be and how easy it is for an outside attacker to gain access to your network by just using the proper tools. Welcome to Wireless hacking for the masses where you will gain additional knowledge about the security of wireless networks.
Disclaimer
Please be aware, this tutorial is not promoting or encouraging unethical computer hacking and it is intended for research and educational purposes only. I am not responsible for any of your actions after reading the information presented here. The misuse of the information on this website can result in criminal charges brought against you. Use this information to test the security of your own wireless network only. Wireless hacking is not something to play around with, please be ethical in your actions.
The theory behind wireless hacking
Hacking into a wireless network is a pretty straightforward business. This tutorial covers the aspects of hacking into a network that is secured with WPA and uses pre-shared keys. By pre-shared keys I mean the “password” you are using to connect to your wireless network. Usually this is the most common way of securing access to a wireless network. Any other way of securing access to a wireless network will not make it susceptible to the attack carried out in the tutorial.
In order to gain access to a wireless network we need to capture the four-way authentication handshake between the access point and a client connecting to it. From this captured data, with various methods, we are able to recover the pre-shared key used by the client to connect. This will give use unhindered access to the wireless network itself. Achieving this is either done by waiting for a client to connect to the network or by forcing an already connected client to reconnect. Either way, the client will disclose the data exchanged in the four-way authentication handshake and we can start recovering the pre-shared key.
Before we begin
In order to follow the steps presented in this article you will need a Kali Linux installation and a compatible wireless network adapter. Kali Linux contains all the tools needed to carry out the wireless hacking but you can install these tools on any other Linux distribution. Also please be aware that your wireless card needs to be able to inject spoofed packets into the network. In the current tutorial I am using Kali Linux version 1.1.0 and Atheros Communications Inc. AR9485 Wireless Network Adapter.
You can get your hands on Kali Linux on the link below
Kali Linux | Penetration Testing and Ethical Hacking Linux Distribution.
In order to check if you wireless network adapter is compatible with this tutorial please check the article
Tutorial: Is My Wireless Card Compatible?
Also make sure that you are familiar with basic networking terminology.
Testing your card
After you got your hands on a Kali Linux distribution it’s time to check if we are good to go. The tools used to carry out the attack come with a handy way of testing if everything is functioning correctly. We will start with this. First of all, let’s find out the name of the wireless network interface on our computer. For this we open a terminal window and type:
ifconfig
You should get something like in the image bellow. In my case, the name of the wireless network adapter is wlan0

Your network adapter could be named differently. Please make sure you use your wireless adapter name whenever you see something mentioning wlan0. After getting the name of our wireless network adapter we can test if the network card is capable of injecting packets. For this we put our network card in monitoring mode. Monitoring mode allows the wireless interface to monitor all traffic received from a wireless network without having to associate with an access point. This permits us to capture traffic from wireless networks without connecting to it.
The wireless interface can be put into monitoring mode by typing:
airmon-ng start wlan0
After running the above command a new network interface, usually called mon0 is created. This will be used to listen for traffic. The remainder of this article will consider that the monitoring interface is called mon0. Please make sure to replace the monitoring interface name with whatever your interface is called.
Please check that your monitoring interface got created by typing again:
ifconfig
The monitoring interface should appear in the list of network interfaces like in the image bellow:

Please note that you can always stop the monitoring interface by typing:
airmon-ng stop mon0
Now that our wireless interface is in monitoring mode and we know the name of the monitoring interface, we can test packet injection by typing:
aireplay-ng --test mon0
If everything is good you should get a message stating that injection is working. You will also get a list of the wireless networks that are in your range. As I stated before, please use the knowledge gained from this article only to test the security of your own wireless network.
Showtime
If you managed to get past the test and your wireless interface card supports packet injection then you are set to go. However, if aireplay-ng reports that packet injection is not working as intended then you have two options. Either find an updated and patched wireless network adapter driver that could solve the problem, or use an external wireless adapter that supports injection. Both options are out of the scope of this article, Google is your friend.
Let’s stop monitoring mode for a while. We will need to do some information gathering before we begin the wireless hacking. As I mentioned before, you can stop monitoring by typing:
airmon-ng stop mon0
Now, after we have stopped monitoring mode, let’s get to the fun part and find some targets. By targets I mean your own access point, leave any other access points alone please. This task can be achieved by typing the command bellow into a terminal window:
iwlist wlan0 scan
This will produce a listing of all the wireless networks in range and provide all the information that is needed for the task ahead. Please make sure to replace wlan0 with whatever your wireless adapter is named.
You should obtain a huge listing of all the wireless access points that are near enough to you. In order to carry out the attack you will need to note down two things: the address of the access point and the channel on which the access point is operating. Both are highlighted in the image below.
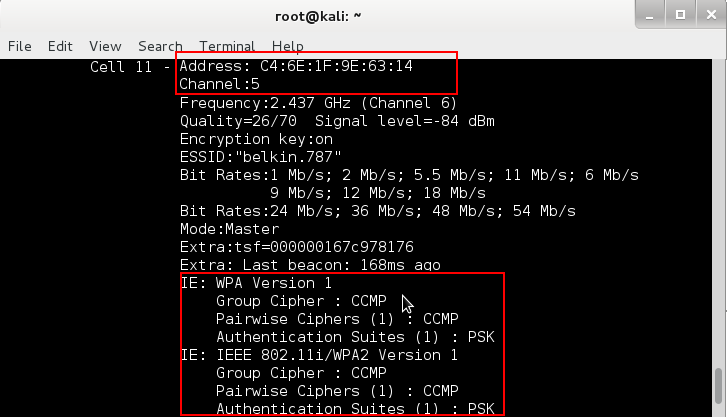
Highlighted in the same image is the fact that the wireless access point is using WPA security protocol and also that the access point uses a pre-shared key (PSK) for authentication. As I mentioned before, this article is only targeting routers that use WPA with PSK.
Now that we have all the required information, head back into monitoring mode by typing:
airmon-ng start wlan0
Additionally, it is wise to disconnect our computer from the wireless network and shut down the wireless interface. Keeping the wireless connection up could lead to problems and some of the tools we will use could fail. Disconnecting from the wireless network is achieved by typing:
ifconfig wlan0 down
Also, take your smartphone or any other device with wireless capabilities and connect it to the wireless network. Do this if it is not already connected. As a general rule of thumb you should have at least one device connected to the wireless network. This excludes your laptop. Next, we should start capturing packets from the access point we are targeting. For this we will use airodump-ng. The basic syntax for airodump-ng is:
airodump-ng -c <channel> --bssid <ap_address> -w <dump_file> <capture_interface>
Replacing the parameters described above with the data gathered using iwlist we get:
airodump-ng -c 5 --bssid C4:6E:1F:9E:63:14 -w tutorial mon0
If airodump-ng is up and running you should see something like in the image below:

Besides the information related to the access point, you should get a list of clients connected to the access point. I have highlighted them for your convenience. Your other wireless device should be in this list. In order to get the authentication handshake from an already connected client, as I told before, we need to force the client to reconnect to the access point. For this, we will send a spoofed deauthentication beacon from our end. This will force the connected client to disconnect from the access point. Normally, the client will reconnect to the access point immediately and it will do the WPA handshake we are trying to capture. All this can be achieved using aireplay-ng. Because we have a terminal window with airodump-ng running, we will need to open an another one. The basic syntax for aireplay-ng is:
aireplay-ng -0 1 -a <ap_address> -c <client_address> <monitoring_interface>
This translates in our case to:
aireplay-ng -0 1 -a C4:6E:1F:9E:63:14 -c 08:3D:88:54:AB:DA mon0
Please be aware that you can omit the -c parameter. In this case all clients will be deauthenticated.
If everything goes right, in the first terminal window that is running airodump-ng you should get a message about capturing the handshake:

There are however some things you need to know about this deauthentication.
The atack may fail with a message stating that “Couldn’t determine current channel for mon0, you should either force the operation with –ignore-negative-one or apply a kernel patch“. This is caused in most cases due to the fact that your wireless interface card is still connected to the network. Disconnect and bring down the interface as I mentioned above. After bringing down the interface repeat the deauthentication atack.
Also, if you don’t see any handshake being captured in the terminal window running airodump-ng, you may be too far away from the client. Even if the access point is in range, the client may be further away and may not receive your deauthentication beacon. Try to re-position your laptop and send a couple more beacons.
However, if you see the handshake being captured you can stop the capturing process by pressing Ctrl+C in the terminal window that runs airodump-ng. In the current directory you should get some files containing the captured traffic. The file we are interested should be named tutorial0.cap in our case. Depending on what file name parameter you gave to airodump-ng your file may be named differently. If you ran multiple capture sessions you should have multiple files named tutorial0.cap, tutorial1.cap and so on. Obtaining this capture file is not the final step of our wireless hacking tutorial. We still need to recover the pre-shared key from the capture, this is what we will be discussing next.
Recovering the pre-shared key
After having captured the WPA handshake, the next step is related to the recovery of the pre-shared key. Without entering too much in details, our task is to crack a hashed value of the this key. This hash was exchanged between the access point and the client during the WPA handshake. You should be aware that cracking a hash is not a trivial task. The success of this step is strictly related to the strength of the pre-shared key. This is why a weak wireless password that can be recovered in a short time leaves your network vulnerable.
The most common ways of attacking this hashed value that leads to the pre-shared key is either using a brute-force or a dictionary attack. A brute-force attack tries every possible character combination until it recovers the pre-shared key. The other option is a bit smarter and tries character combinations from a word list or dictionary. Please note that having a password consisting of common words or word combinations makes a dictionary attack trivial.
We will be focusing on dictionary attack in this tutorial. The tool we will be using is called aircrack-ng. This tool will take every word from a file we provide and check if it generates the same hash that we captured during the four-way handshake. Before starting up this tool we obviously need a dictionary. Doing an internet search for “WPA dictionaries” will return a huge number of results. Download the ones you find suitable.
Having a dictionary enables us to launch the attack against the captured hash. The syntax for aircrack-ng is:
aircrack-ng -w <dictionary_file> -b <ap_address> <capture_file>
In our tutorial we will use:
aircrack-ng -w dictionary.txt -b C4:6E:1F:9E:63:14 tutorial*.cap
This is it, this is how wireless hacking is carried out. Now we need to wait and depending on the complexity of the password this may take a while. I hope that your password is strong and aircrack-ng fails to recover it.
Another tool that carries out attacks on hashes is called Hashcat, I will write an article about this later on.
You can always do the cracking online, for a small cost of course. You can access a WPA hash cracking service at the link below:
Online Password Hash Crack MD5 LM NTLM SHA1 MySQL OSX WPA(2)
Securing our turf
Seeing how easy wireless hacking is we should probably have a few words on how to secure our network. I will not get into much detail but the first thing you can do is to choose a strong password. This password should be long enough so that brute-force attacks are not feasible against it. Is should also be complex enough so that dictionary attacks fail too. Also, change your password often. I would like to recommend a password generator that generates complex but easy to remember passwords. For example you could check out:
Automated Password Generator Online
Another good option that can turn into the best option is to turn on MAC address filtering. This can turn into a hassle if you have multiple clients connecting to your networks or having many guests using your wireless network but believe me, it works. By turning this feature on you only allow a defined list of clients that are allowed to connect and stop anybody else, even after recovering your wireless password to abuse your network.
Good luck and stay secure!
T3ZlciBBbmQgT3V0IQ==
Yes that works if the password is not very strong, another option is wifite in kali
GPU cracking has gotten pretty fast nowadays
Yes, the only downsize is that you need a lot of space for a good dictionary.